Keezer Project
A log of the various steps involved...
I love brewing beer, and sharing it with my friends (my girlfried in particular), and guests. Oh, I love drinking it as well :-)Hope this can help you in building your own Keezer, avoid some of the mistakes we did.
You will see a number of pictures of my keezer project, with comments as it is taking shape. For those that don't know it, KEEZER is a Keg fREEZER.
Here are some pictures of the finished project, but as you scroll down the page, you will see the making of... What you won't see is me, as I'm the one taking pictures.


Today is December 17, 2017.
You are seeing the first beer that sits on a bran new drip tray, the final addition to the keezer. I decided to update this blog with new pictures.
Notice also the amazing tap handles (including the dark Stout handle). None are identical, as they are just like the beer they dispense: artisan made. Nathan Shirey (from the MoB) uses wood he finds around his house, and makes them. If you wish to order handles from him, just send him an email: ennesheli@gmail.com.
Now, back to the blog, and how this happend...
All my brewing equipment is in the garage, including my old keezer. My first decision was to build a new one, in my dining room. I chose the exact spot for it, and measured the maximum size...
My choice: a 20 cubic feet chest freezer. Here it is (Frigidaire):

I looked at the specs, and figured I could fit up to 12 pinlock kegs inside, have room for yeast, and space next to it for the gas (Co2, and Nitro).
My plan: nine (9) normal dispensing taps (connected to Co2), and one (1) for stouts. A couple more kegs can sit in the cold space, ready for use.
FIRST DAYS
Stupid air-vent !!!!!
No, the air-vent is not stupid, but the location forced us to build a base, to elevate the freezer, and push the air forward.

You can see the air-vent hole. The centre wood should help direct air to the front.

Adjusting the inside of the hole, so that the tin will fit nice, and tight.
Added some foil tape, and made an opening in the front (as wide as possible).
Placed my hand on the opening: can feel the air! Perfect :-)
Temperature control:
I then worked on the temperature controller. This is something I had done a couple times before, for my fermentation chamber. Got one of those real cheap STC-1000 controllers, and did the electricity.

The only other thing included was a temperature probe. The rest is up to you.

OK, big mess. Wires, and things I keep in a box for crazy projects, like this one ;-)

Here it is... tested, works great. I even made both sides work, one cold, one hot (not sure it will ever be required, but why not?). Extended the wire of the temperature probe, as I plan to have a jar of water sit on the freezer compressor, white the STC will be at the other end of the freezer. I like to measure liquid temperature rather than air.
Collar
My freezer is new, and I'm not comfortable with drilling holes into it. We removed the door (and cut the LED wire), so a wood collar can be added. I'll be able to run my lines, and faucets through the collar. Most keezer project use this approach.

Must explain a couple things. The right part is for placing my gas tanks, and my temperature controller. My collar is double, so I can run insulation inside it, with the temperature probe.

First mistake
The inside part of the collar must be levelled with the outside. We nailed some scrap wood to level things, and started to insulate... Yep, mistake :-(
When the insulation dried, it elevated the outside collar ... things were no longer levelled (and they must, to put the surface board). Also, we forgot to run the temperature probe inside the collar, so it would not get in the way of the kegs.

My friend Joff having an espresso, inside the keezer. Hope he finds a solution to the problem, as this sucks !!!!! He has been helping me like you can't imagine (tons, and tons of free beer for him)
The solution (both or brains were used for this):
Very simple, we removed all the insulation with a knife, and used silicone to glue the outside collar to the freezer.

A few long flat boards, and buckets full of water (for weight). Now, we have a 24 hour break, as the silicone must dry.

The freezer had shelves, and things I did not want. We removed the plastic protruding things that hold the shelves, and filled the holes with the rest of the silicone tube. Will have to buy some more silicone. This will not be the last trip to the hardware store (they never end).

This temporary thing is to hold the front board very close to the freezer. There was some unwanted space.
Please note that all of the above was done over a period of 3-4 days (a couple hours each time, often less, sometimes a little more).
Today, I started the blog, and will post the entire project as it evolves.
Post Canada just delivered a box from OBK !!!!!

I'm about to unbox. No!!!! I will not do a video of me unboxing this (but I do love when other people do that on youtube).

Here is some of the stuff I ordered. I'll be using as well material from my old keezer (still in use).
Friday, 23 September 2016
BLOG DAY 2
If this project is beer related, the beer drinking is often after the work, not during. But then, to each his own rules :-)
Today, we started by drilling a few holes. I have a dual gauge Co2 tank, and a nitro tank. The other holes are for the temperature probe, and line. Since the inside collar is not fixed yet, we removed it for now.


The view you have is from the inside of the keezer.
- The gas tanks go in the section behind the hole you see here.
- Picture on the right shows the temperature line.
More wood dust, this time from the jigsaw.


And yes, you guessed it, this is for the STC-1000. It will be located on the top right front of the keezer. It fits just perfect, but will be placed after the wood is varnished.
Now, the inside collar. This time, we will not mess things up. Our challenge here is the fact that this collar is not in direct contact with the entire edges of the freezer. The front is fine, but the back, and sides don't touch.


Both pictures show the gap. We nailed some scrap wood to far end corners, to ensure that the collars are of same height (and don't move).

This time, we did not forget to place the temperature line (no more 4 letter words)


Now, for the gap issue. To prevent the insulation from passing through the gap, and lifting the inside collar, we placed some duck tape along the open edges. We then added just a bit of insulation, in some key spots. We think that the inside and outside boards will dry together, without moving.
*Take a close look at the picture on the left. See how all the screws and things are between the collars? They will not be visible at all. This something to think about, if you do a double collar.

I told you the front part had no gap. We simply applied silicone here. And yes, things must stop for the next 24 hours.
And this ends the blog for today. Next step will be to do the insulation (I'll do this part on my own, as even my limited skills can handle that part). Also, Joff will go fishing.
Sunday, 25 September 2016
BLOG DAY 3
Some days require less effort. Today was one of them (good thing, as Saturday was a beer pouring generous night (read hang over).
I noticed the collars on the long part of the freezer were not very tight. Before adding insulation, I decided I would solidify the frame.

Those bars will be removed on Monday.
Next step was to make a few more holes, for the gas tubes.
The outside collar holes were done last time. Made 3 more holes (inside collar), and ran the gas tubes through the holes.

The 2 far end tubes will be connected to 2 different gas manifolds. For that reason, the lower one is very short (a 3 way gas manifold). The other line will go to the 6 way manifold. For those familiar with manifolds, you know the connection is barbed (well, all the ones I've seen were barbed). The other end of my gas tubes is threaded. just as required for my 2 way gas regulator.
The other line is for my stouts... I'll only have one at a time, so a gas manifold is not required. The threaded end goes inside, so it can connect to the keg. And guess what? My Nitro regulator has a barbed end, so all works.


Now, I trust I can insulate the inside of the collar. This stuff will take volume, hope I did not shoot too much.
And this ends day 3. Will let things dry for the night.
Monday, 26 September 2016
BLOG DAY 4
I've been sharing this blog with the guys on the MoB, and a couple coments talked about the heat that normaly escapes from the freezer. In the owner's manual, it is written that sides and top should have 3 inches of air space. There is nothing about the front, but I'm sure it has the same requirements. I was hoping to find diagrams/detailed specs/whitepapers on the Internet for the freezer, to see the exact location of the coils. I even contacted Frigidarie (Electrolux), to see if they can send me something. My current idea would be to make nice looking openings (lines/holes) on specific areas of the front board, but I don't want the finished keezer to look ugly. No carpentry on the sides, and the top has a collar, so the front is the only issue.
Was about to work on the project, but Hydro Québec failed.... no electricity for over 90 minutes.... No more Internet, can't cook, can't brew, can't use power tools... Shit it sucks not to have power.
I went into the garage, and had a couple pints of beer. That was nice. A fresh Pamplemousse (my IIPA that tastes like grapefruit), then a Gluten Plus (my wheat beer).
Sometimes, I run Oxyclean, and hot water in all my keg beer lines (well, kegs that are not in use). So no progress on the project, but, sure did some keg cleaning:

Here is my current Keezer... Perfect for a man cave, but not for a dining room. 3 taps, not enough!!!!!

This group of kegs is full of beer.... Ready to go into the new keezer. Won't play with those...

When the unused kegs are clean, I'll do some racking... We have 2 cream ales (left), and 4 saisons (right).

And my keg cleaning area...
What a bad keezer building day !!!!!!!!!!!!!!!
Tuesday, 27 September 2016
BLOG DAY 5
A word about the insulation product:

I'm sure all hardware stores have this product. I get it at Réno-Dépôt, in Hull. They have it close to the section COMPTOIR LES PROS, so you don't have to walk far inside the store to find it. The price (taxes included) is $17.22 per can. If you buy 3 at a time, you save 10%. My advice: buy 3, and keep your receipt. You will save time on trips to the hardware store, and 10%. in cost If you only use one or two, then just return the cans you did not use.
Guess what? I did individual trips each time (grr: oh f**k)
Joff is back, and will be over after work. Since his help is of great value, I will not say a word about his fishing trip :-)
Here is a picture of the project, after I added a second layer of sealant.

More things to come, later...
Wednesday, 28 September 2016
BLOG DAY 6
Some of the insulation grew rather high. No problem, nothing a knife can't fix...

Yes, getting this flush was necessary, before adding the top of the collar (pine, again)


Adding the top of collar sure makes things look nice.
A couple very important notes:
- Don't mess up with the nails...take your time :-)
- Leave the front center of the collar nail free: holes for the beer taps have not been drilled yet! We don't want nails on the way.
The next step was to attach the door to the freezer.


The lid now sits in a higher position than before (because of the collar). If you look at the right picture, you will see that we used 2 of the existing freezer holes, and added a couple more in the collar. A little lower, you can see 2 holes in the freezer we no longer use.
VERY IMPORTANT: do not drill new holes in the freezer, drill them on the metal spring/bar. A good precaution advice: When you screw (or unscrew) the door, have an other person hold the metal spring/bar. It can be very painful, even dangerous, to get that thing spring onto your face, eyes...

Now, the door is set ! You can see very well the right side section, that will be used for the temperature controller, and gas tanks.
This Sunday, we will work on adding the wood carpentry to the lid. We would have done most of it on Wednesday, but my miter saw, and both of Joff's miter saws, had angle calibration issues. The 45 degree angle is a little off.
I've never done this, so Youtube to the rescue.. Here are a couple of videos that should help:
Monday, 3 October 2016
BLOG DAY 7
Got back into the project, on Monday. First, let me tell you that both videos you see here do not apply to my Milwaukee Miter Saw. I'll film, and post a video later, on how to calibrate my saw.
So today, we cut the corners that will cover the top of the keezer.


We will use nosing (yes, what is usually used for stairs). This will make a nice finish for the top, and sides. It will over lap on top of the front board as well, so this will not only be esthetic, it will also create options for the drip tray (and locking system I'll talk about later).
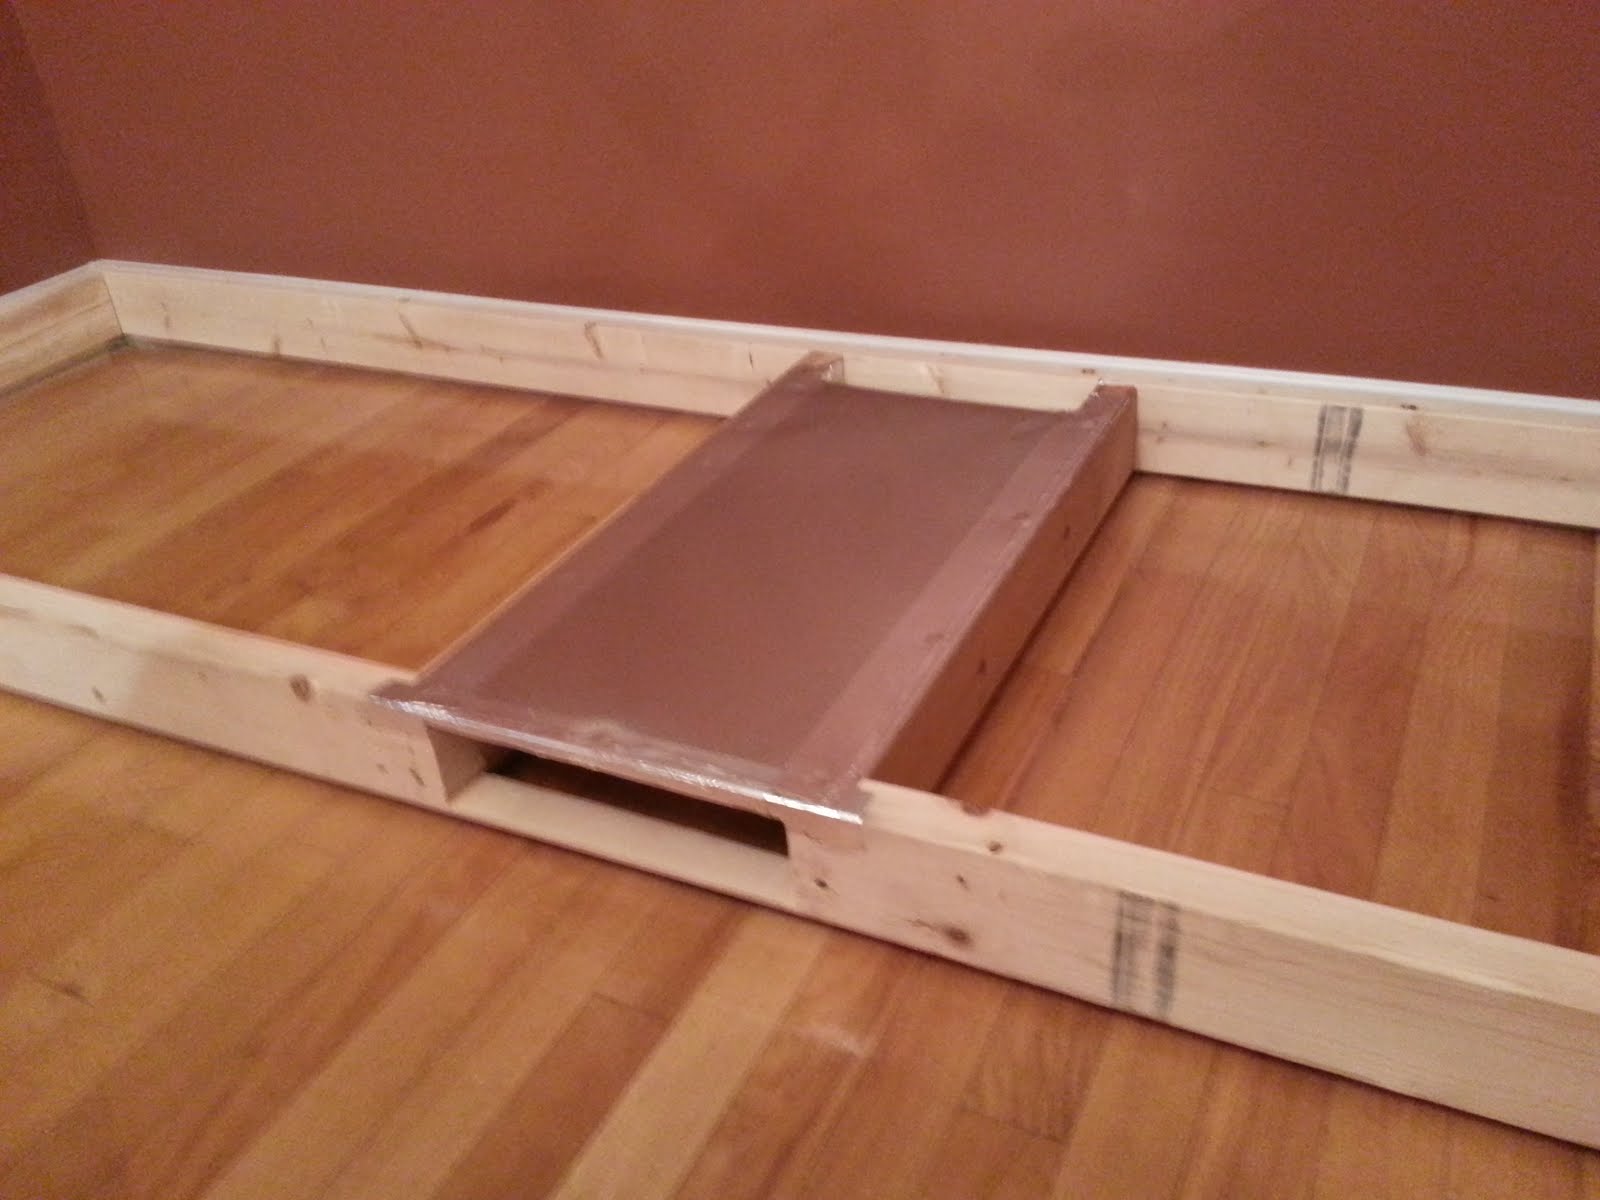
The plan is to make a frame, and later, get a board cut for the main surface.


We used carpenter glue, a carpenter square, and made the corners. Used a couple of clamps, and made sure the angle was a perfect 45 degree angle.
Tuesday, 4 October 2016
BLOG DAY 8
We are getting very close to the fun things. The nosing corners dried very well. Now, we must get the surface ready for the addition of the big top board :-)

First thing was placing some shimming, to make sure the gas side is at the same level as the keg side.
Please note that the nosing is just sitting on the surface, it is not fixed yet. Each side will open individually, as it is not necessary to open the keg side, when changing a Co2 tank. A small gap is required, to open the tops in a smooth way. You can see it on the picture above.


The shimming was very temporary. It allowed us to measure the cuts, for the soldier blocks. The keg side did not require blocks, as there is the freezer door, but the other side must rest on something.
Once the soldier blocks were fixed, we removed the side board that was there to help us. A new larger side board will be added next time.
Wednesday, 5 October 2016
BLOG DAY 9
Picked up a 4x8 red pine board, for the top (and side). Got it cut on site.

The board is simply sitting there, next to the crown. Nothing is glued in place, we will do this Thursday.


On the left, the rest of the pieces that will be used. Rona, and Pilon, can do perfect cuts.
On the right, placed my beer gas tank. My Co2 tanks are in the garage, one for the old keezer, and the other to either force carb kegs, or to use with the carbonation caps on pop bottles.

And this will be my oil sealer. It is natural, and does not require sanding after each coat. So as you see, this project is getting closer and closer to what I want.

The board is simply sitting there, next to the crown. Nothing is glued in place, we will do this Thursday.


On the left, the rest of the pieces that will be used. Rona, and Pilon, can do perfect cuts.
On the right, placed my beer gas tank. My Co2 tanks are in the garage, one for the old keezer, and the other to either force carb kegs, or to use with the carbonation caps on pop bottles.
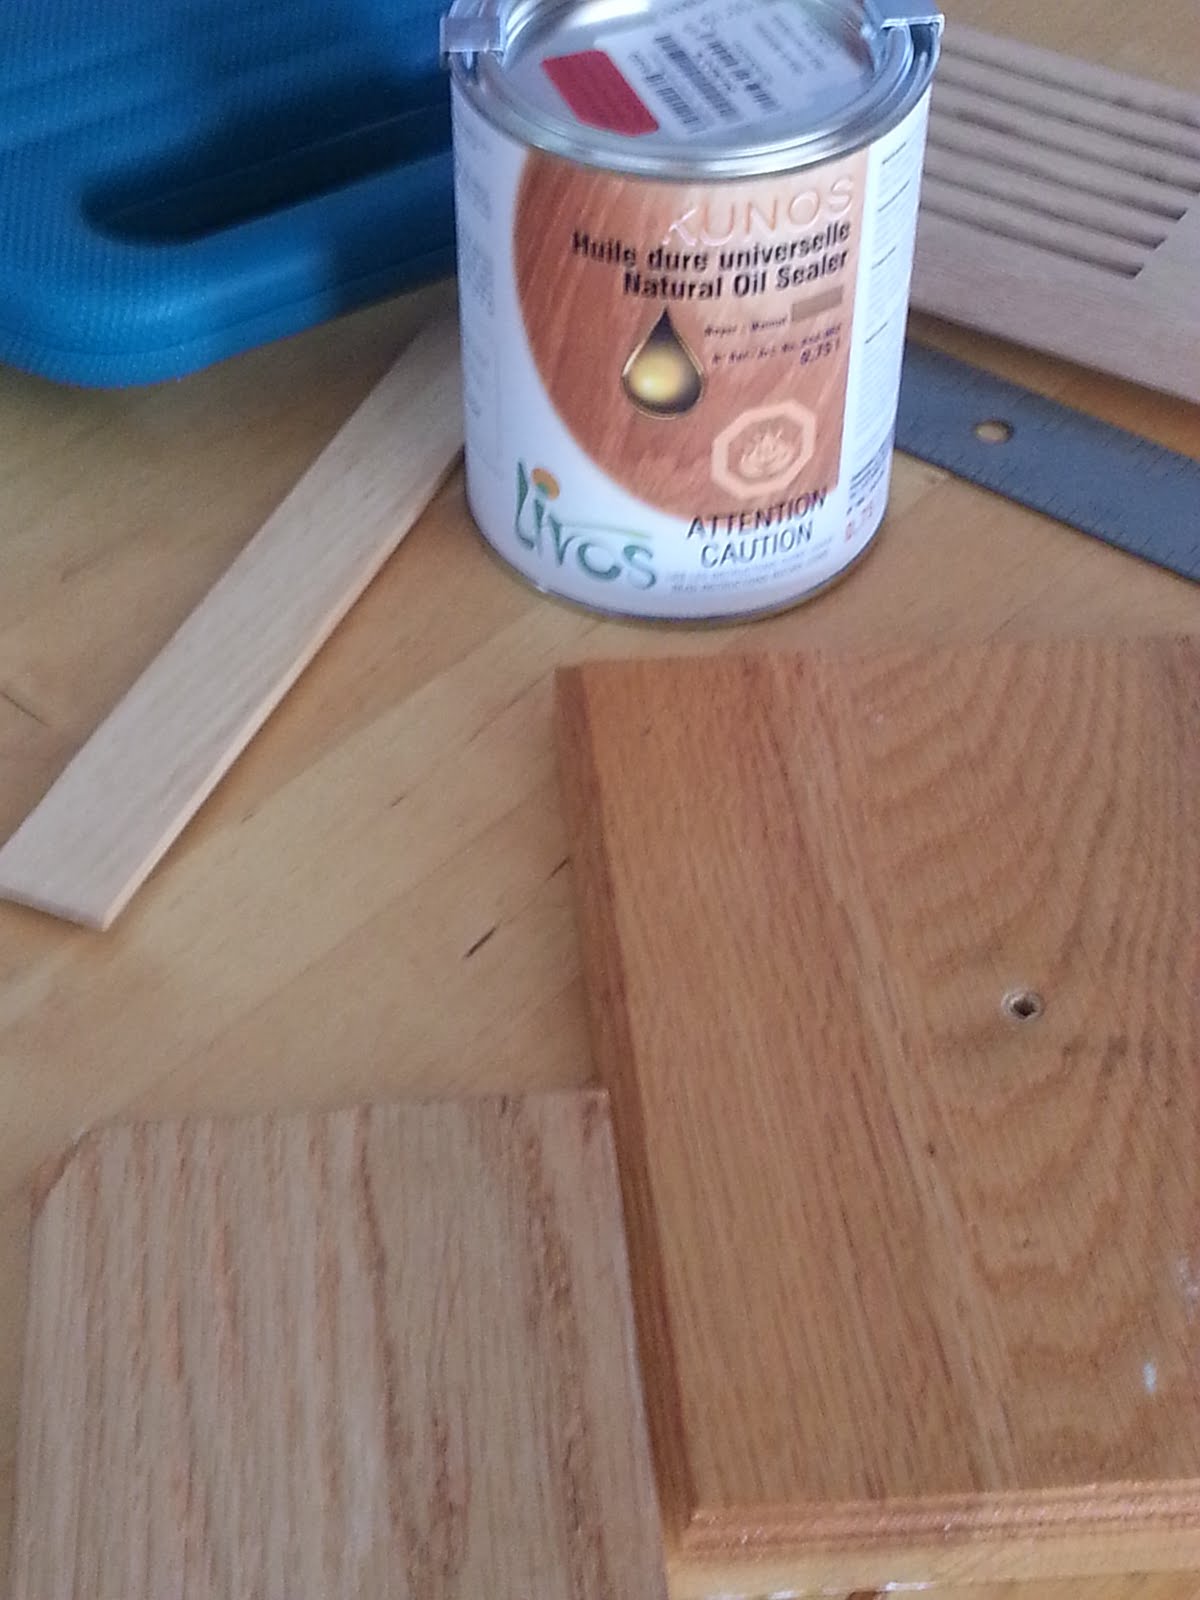
And this will be my oil sealer. It is natural, and does not require sanding after each coat. So as you see, this project is getting closer and closer to what I want.
Thrusday, 6 October 2016
BLOG DAY 10
A number of times, we (Joff and I) were debating on the order of things: we fix/glue the board to the top, then the crown, or the opposite. Today, we found a different approach, and we are very happy with it: we decided to glue the crown to the board. That way, all will be flush, and it will be easy to fix those parts to the keezer. You should be reading YES!!!! This is it !!!!

We placed a few 4x4s, and shimming, under the board, and crown. This will be key, as we will slide ratchet straps all around, for pressure. The foil was to prevent the carpenter glue to stick to the board. In retrospect, not sure the foil was of any use.
We then covered the connection area (crown, and board), with some carpenter glue, and then added some pressure with the ratchet straps.


Left picture: large board & crown. Right picture, the small board & crown (that fis on top of the gas section).

To end things, we screwed a board on top of the base, in the gas section. Yes, nice finished red pine, but this was scrap wood, so why not?
Friday, 7 October 2016
BLOG DAY 11
On Friday morning, before work hours, we decided to work a little on the keezer project.
The carpenter blue did a great job, and we both feel there is no reason the crown will ever separate from the main board.


Some sanding was necessary, to get rid of the glue, and make the crown, and main board perfectly smooth. Why produce dust for nothing? We went outside, nice warm morning, perfect for the job.
A word of caution: do not oversand, as you will have permenent inperfections.
The next step made me feel that the keezer is progressing very well. Yep, time to glue the top to the door.


Not sure I have anything to add here, it is rather obvious, right?

We carefully placed the top (crown/board), protected the surface, and added weight. This must dry for 24 hours. Also, that day, after work, I was leaving to Lake Placid with my better half.
Sunday, 9 October 2016
BLOG DAY 12
Had a great time, in Lake Placid area. If you like hiking, we went to Whiteface Mountain. Just AMAZING!!!! I'll go back for sure. Today, my entire body hurts, but this did not stop me from progressing on things.
I buffered the wood surfaces (front, and top), then vacuumed things.

I used a sponge, and rubbing alcohol, and cleaned the entire surfaces.
After that, I started applying the sealant. I used a cloth, and rubbed some on part of the surface. I also used a sander, with a special round cloth/sponge thing designed for sealing. As you use it, generates heat, and makes the sealant work better.


Oh, make sure you have a drop sheet on the floor, and clothing you don't care about. This can get a little messy (just a little).

The right side has a little sealant now :-)
And after a good hour of work (probably more), here is my keezer, with one coat of sealant.

I think I'll add the other coats before drilling the beer holes, or placing the STC-1000. I expect to add 2 more coats on the top, and one more on the front. The gas door will also have to be taken care of, but we will attach it to the keezer first.
Monday (tomorrow), is Thanks Giving. I don't care about football, or turkeys. But a full day off, I think I'll brew beer, otherwise, what is the keezer good for? Joff will come over (he will be back from his hunting weekend). We will brew, and work on the keezer at the same time.
Friday, 14 October 2016
BLOG DAY 13
Very little to add here. Continued adding layers of sealant to various parts of the keezer. Each time, had to wait 24 hours before adding more layers.


Sunday, 16 October 2016
BLOG DAY 14
Now, things are getting more serious. While Joff was hunting (again), I decommissioned my old keezer. I will use this as a freezer, for my hops, dry yeast, and cooling source. The holes in the back will be connected to both of my fermentation chambers... great for making lagers, even during the hot summer days.

Later that day, with Joff, we placed the second door (the tank section). Lots of precision involved, to make things in line.


We had a remove a small portion of the side wall, as the door could not open 100%.

Here, you have a full view of the side. Notice we have added corner molding. Why is the board not complete? Simple... the side wall was made using left over wood... Once the unit in place, the kitchen counter hides the bottom, so you can't see the wall is not complete. The top part was important, since it is higher than the kitchen counter.

This offers a back view of the keezer... We will move it to the wall, as we no longer require access to sides, or back.
 .
. 
Getting there, right? Better, as I have lots of kegs, and no more keezer!
We decided to make holes, for the taps...
Very important to measure things.. We used tape, and marked the spots.


At first, we just made little holes, then removed the tape.

Those small holes soon would become bigger holes :-)


The drill bits get very hot.. and wood has to be removed after each hole.
Monday, 17 October 2016
BLOG DAY 15
I got up early, and had fun adding the temperature controller, and tanks.


Adding taps was fun, well no!

Guess we had not done a screw up for a while, so this one qualifies.. If you look at the picture, you will notice that the only way to keep the keezer closed, is when taps are OPEN... The only faucet that did work well, was the stout.
Guess there is only one solution. Test the stout tap, and drink an Irish Red.

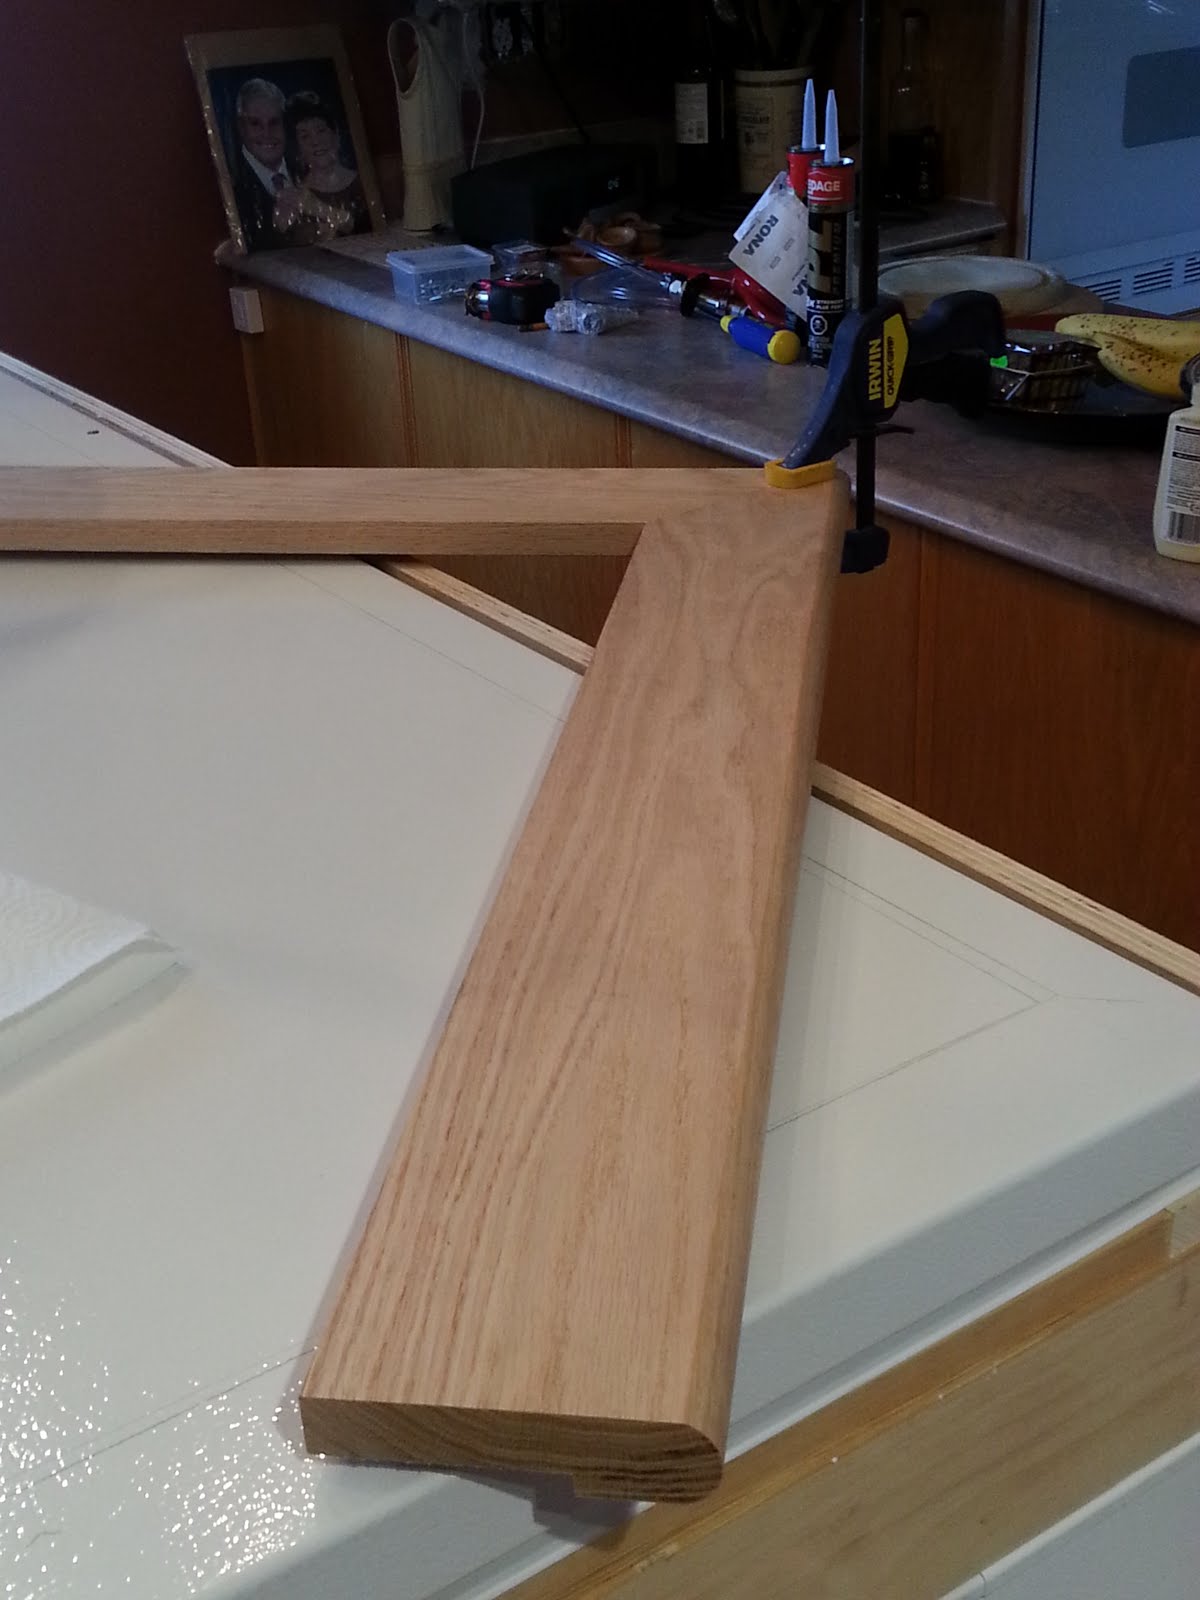
Well, no, one more thing to do... add surface, for the faucets to come out more in the front. Picked up a nice $45 red oak board... 6', 3/4''. Cut that in 2, and glued it to make a thinker board.

Now, waiting is required (for the glue to do it's work. The small wood blocks were to prevent clamp marks.


Adding taps was fun, well no!

Guess we had not done a screw up for a while, so this one qualifies.. If you look at the picture, you will notice that the only way to keep the keezer closed, is when taps are OPEN... The only faucet that did work well, was the stout.
Guess there is only one solution. Test the stout tap, and drink an Irish Red.

Well, no, one more thing to do... add surface, for the faucets to come out more in the front. Picked up a nice $45 red oak board... 6', 3/4''. Cut that in 2, and glued it to make a thinker board.

Now, waiting is required (for the glue to do it's work. The small wood blocks were to prevent clamp marks.
Sunday, 23 October 2016
BLOG DAY 16
I love brewing on Sundays. Don't you? While waiting for the strike water to get to 75 Celsius, we used a router, and shaped the tap board. Please note that Sunday was a great brew day :-)


In a way, I think I'm glad about the fuckup... the faucets will look great on this new thing. It gives more dimension... We ended the day, drilling holes in the faucet board.


In a way, I think I'm glad about the fuckup... the faucets will look great on this new thing. It gives more dimension... We ended the day, drilling holes in the faucet board.
Monday, 24 October 2016
BLOG DAY 17

Fermentation is crazy!!!! Glad I did not use airlocks :-)
Real soon, the keezer will be ready :-)

The first coat is almost dry, will add one more on Tuesday. Placed the gas lines, and cooled the kegs (Wednesday, we will use the keezer).

On the left, my 6 way manifold. On the right, the old 3 way one. My stout does not require one.

So now, 10 kegs inside... and room for 2 more. The left part (on top of compressor), I'll place my liquid yeast.
Wednesday, 26 October 2016
BLOG DAY 18
I added the beer lines, and faucets, and all. The same evening, I invited Joff to come over, not to help, but to sample a bunch of beer :-)


Oh, how about a few more pictures?


Now, the failed part of my blog (not keezer), is I don't have many pictures related to the drip tray.
I was over a Olivier's house (an other Mobster), and friend. We brewed an Oatmeal stout together (as he just finished his new electric setup), we ate moose he hunted, then went to his garage. In just a few minutes, he build for me the wood structure that would hold both 20'' SS drip trays. A tree fell on his property a few years ago, so he worked it into long think boards.
Olivier used what is called in French, une fraiseuse. I think you call that a milling machine (I'm not sure). He used that to cut the inside edges, where the tray will sit inside.
He then used a router to carve out the rest of the wood.
Once home, I sat the new thing on a milk crate, and added coats of varnish.

That is it! All done !!!!!
As I write this, I'm finishing the pint of beer you see on the first pictures. A delicious saison :-)
Cheers,
Feel free to send comments and questions.


Oh, how about a few more pictures?


Now, the failed part of my blog (not keezer), is I don't have many pictures related to the drip tray.
I was over a Olivier's house (an other Mobster), and friend. We brewed an Oatmeal stout together (as he just finished his new electric setup), we ate moose he hunted, then went to his garage. In just a few minutes, he build for me the wood structure that would hold both 20'' SS drip trays. A tree fell on his property a few years ago, so he worked it into long think boards.


Olivier used what is called in French, une fraiseuse. I think you call that a milling machine (I'm not sure). He used that to cut the inside edges, where the tray will sit inside.
He then used a router to carve out the rest of the wood.
Once home, I sat the new thing on a milk crate, and added coats of varnish.

That is it! All done !!!!!
As I write this, I'm finishing the pint of beer you see on the first pictures. A delicious saison :-)
Cheers,
Feel free to send comments and questions.